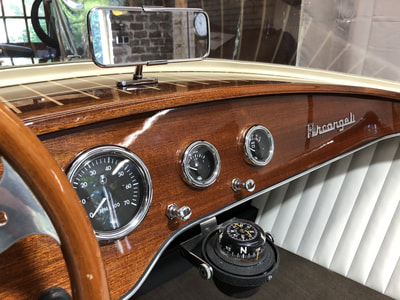
Arcangeli Jolly #399
The history of my Arcangeli can be imagined, although small parts of the story have been presented during the renovation.
The fact is that I own this Arcangeli since 2014.
Found it on a internet Marketplace, and I fell for the beautiful lines of this small Italian runabout.
The boat was in Vriezenveen, Overijssel (Holland). Few waters to find there, the boat was in the owner's garden?
In deplorable state. No fittings (but the chrome nose, more about that later), no interior, no windshield.
A hull - from which the renewed deck at the time was already released.
Pluses were the robust body wood (massive slats screwed and glued) and the subjective feeling that the boat still had some consistency.
Inside painted entirely black, with a layer of humus and a decent load of fresh autumn leaf.
Apparently there was no tarpaulin in stock to cover the boat against the elements. This became a question of conscience.
How much effort do you have to make in order to let this beautiful Italian beauty float over the water again?
And was the basis still sufficient to carry out the renovation with a limited budget?
After all, the value of an Arcangeli will probably never be able to match that of blood brother Riva (although there is not much difference in terms of quality, but this is the name). Like so many decisions I make - the emotion weighed heavily. This is just a nice boat. Let's do it!
The story of the previous owner is that he wanted to renovate the boat together with a neighbor.
The duo certainly had the necessary knowledge and expertise. The previous owner is a carpenter and the neighbor is an upholsterer.
Together they would make something of it. However, the space in the hangar of the neighbor turned out to be necessary for other, professional purposes over time, and the Jolly came to lie in the garden. And the courage had sunk even further.
There was also a more realistic view on the amount of work. Incidentally, I have also gradually found out. If I had known, I might never have started it!
After the hull was lifted on the trailer recently and purchased and adjusted, the return trip to North Holland was a go.
Thanks to two great friends who probably still have problems. Then the thorough inspection of the "booty" bought at home.
First demolish the inner wall cover and then remove the floor parts. Oops............ some rotten trusses, in some places a soft keel bar and plywood that was already delaminating. This was a moment of hard landing.
It was necessary to move the boat to a workshop with more experienced people who could help me with making a plan.
I managed to get a place in the shed of a ships carpenter with a good reputation.
There were more men busy with their boats and they helped each other with the sometimes difficult challenges that they faced when
building or restoring wooden boats.
The use of equipment and small items was included in the rent, provided that an empty drawer was replenished on time.
And on top of that, the workweek ended on friday afternoon with a beer and Dutch music.
The location was about 20 minutes from home. From that moment on I would be able to be found regularly in this
warehouse after working hours and on Sundays.
Meanwhile, I had the feeling that a radical "body-off" restoration would cost a lot, also because I dont have the needed knowledge.
After talking with those men, I chose a different direction.
This consisted of replacing bad frames from the inside and applying "modern" techniques, such as epoxy injection and reinforcement with carbon fabric. The keel beam has also been hardened in such a way, and reinforced with a laminated top layer.
I had a lot of support from the famous book Wooden Boat Renovation by Jim Treffethen.
This made it possible to carry out a lot of the work itself. In fact, I have been able to save the hull and probably made it firmer than it ever was. Purists argue that the boat is not authentic anymore. There is actually nothing to disagree but the cost / benefit consideration has led me to this pragmatic side, supported by an ANWB valuation. I had to insure the boat as an obligation from the lease for my part of the workshop.
The estimate was that the final value of the boat would not justify a radical restoration in a purist approach.
Now that the hull was "hard" again, it was time to remove the old deck and wood to put a new deck on it.
That turned out to be quite a job. In the past a new deck was already laid, and it was completely screwed and glued.
So it was not possible to remove it without damage. At the ends of the mahogany slats it still "moved" - because of the long-lasting effects of moisture, this already had space. But more to the middle, the damage was bigger. I ended with a lunar landscape that was not suitable for placing a new deck. So I decided to level the rough bottom deck with epoxy filler and then tighten it by sanding and gluing a fiberglass mat over it.
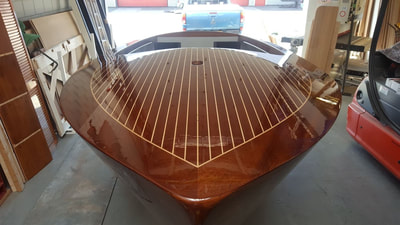
Then immediately you see the special shape of the deck. It is in fact convex in two directions.
There is actually no straight piece of wood to be found on the whole boat, except for the sides.
Incidentally, this requires some of those who rub, maintaining these beautiful fluid forms is crucial for the ultimate appearance of the boat.
Fortunately, a good friend could help me with this. We have spent many days and nights to this..
Now that the whole thing was tight again it could be covered again with new limewood of solid mahogany and
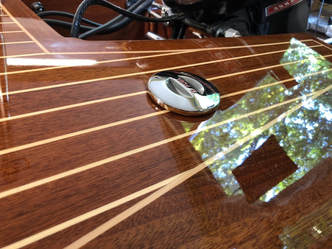
he parts in the middle with so-called Riva wood.
These are prefab plywood panels with mahogany slats and thin wood inlay with contrasting colors.
Because the deck bolted in all directions and we decided not to screw, a special glue technique was needed.
This is because it is glued with vacuum.
In simple terms, this means that the boat was packed in a large plastic bag that was vacumed after application and bonding of the new decking.
A large amount of lead was also placed on the edges. It is estimated that this together weighed more than 200 kg.
Together with the atmospheric pressure, it was thus bonded very permanently because all the air was removed and the pressure was distributed very evenly, so that no local stresses could arise.
The results are impressive. It not only looks very tight, the boat as a whole is also very solid.
I had now reached a point where the entire structure was in order again, and another period would begin.
To know, sand, paint and finish. I would prefer to do this in one place closer to home.
Fortunately, a friend has a large shed behind his house where I could be welcome. And then also a few minutes by bike.
Because the winter was coming, some haste was needed, the whole had to be sanded quickly and then put it in the epoxy.
The barn is not heated and could become quite damp. I soon found out, no ideal situation.
Working under pressure just does not go so well. At the end, I outsourced sanding, epoxy and topcoats.
And from that moment on it could be completed, the best work.
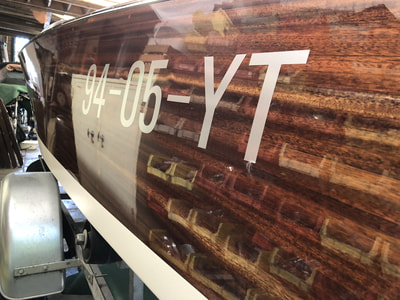
In addition, I still encountered a trademark, when applying the nose piece again. Every Arcangeli has a hull number, the serial number of the boat.
And now the case is that they can be found in two places: on the keel bar and on the inside of the nosepiece.
And those numbers were not same ........ the keel bar had #393 and the nose had #399. Those who know it may say so.
Because the keel bar for the preservation of firmness has been considerably modified, the number is now no longer available.
So I just presume that my boat hull number 399 because that is controllable.
As I said, I did not have a hardware or window, steering or anything else.
So I had to look for what was still to be found, and preferably original or new with a look that matches the time in which the boat was built.
Unfortunately, this search proved extremely difficult; there is nothing to be gained at the present Centro Nautico of the Arcangeli heirs.
In fact, my e-mail messages were unfortunately not responded at all.
So from that moment on I thought of putting the boat to my hand and looking for interior, windshield and fittings in a style that I like.
Then a great accident happened. When I bought the stainless steel bumpers I came in contact with a web shop, and after I described my boat and explained what I needed a short silence fell on the phone. It turned out that the person had done an internship many years ago at a woodworking company and almost certain that he had put the slats of mahogany on the hull. I then sent him a number of photos by e-mail and it certainly was.
It was more than 10 years since he had worked on it and at the time there was a windshield, as well as the original steering gear.
Of course I asked which company it was for, but unfortunately it did not exist anymore.
So the search for original parts was definitely over.......
At first I wanted to find a complete windshield. I searched the internet , but each boat is different.
The chance that you find something that is both still in reasonable condition and fits well is actually nil. I then looked at a Riva restoration company and it turns out that in ancient times a rubber foot frame, the basis for the window, was simply attached to the deck with nails!
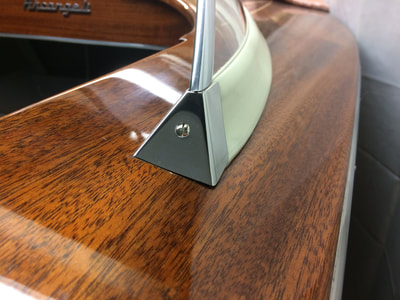
This Riva rubber is still available at a very reasonable price. After placing this list - not nailed but with stainless steel screws attached - I made 4 mm MDF a "window". Finding the right form was quite a job. A window that is high and fairly upright gives the most protection against wind and water, but looks rather tricky. I find the line of a low, stronger inclined speedster window much nicer and better suited to the line of the Jolly.
After trying for a long time I had found the ideal shape and with the MDF mold I could cut out a piece of lexane in the right shape and fix it with transparent silicone glue in the foot of the frame.
The top edge was finished with a thin chrome frame. And the stainless steel end caps are also made by myself. Not original at all, but still very successful.
I wanted to recreate the steering completely.
At first I thought of hydraulic steering, but the limited space on the inside of the mirror threw a spanner in the works.
So only opted for a simple solution with gear and Bowden cable. A matching steering wheel I found in an old steering wheel, made in the 60's and can be found in many classic Italian sports cars. A suitable gradient hub was not to be found, even though I wanted to operate the horn (push button in the center of the steering wheel).
That was custom work, there was also a towing contact in etc. Also this job was done with the right help. Where a lathe can be good for.
Of course I also had to look for a suitable outboard engine, preferably from the time of the boat itself.
After a while I ran into a Mercury Kiekhaefer 350 (35 hp twin) from 1968. Fits perfectly. These two-stroke engines are known as robust and reliable.
They can be started electrically and also have an electric choke control. In combination with an external low-pressure electric fuel pump, the entire operation can be done from the dashboard.
Also, both contact points of the ignition are forwarded at the original cable harness.
Necessary to silence the engine (short-circuiting of the dots makes it stop) and in principle also suitable to connect a modern tachometer.
Incidentally, with a self-made electronic circuit to reduce the high voltage to a level suitable for the electronic tachometer.
Unfortunately, these motors do not have a charging coil, so the battery can not be recharged during navigation.
Advantage again is that with an empty battery can just be started with the starter cord. The ignition is in fact of the type magneto.
These do not require an external voltage source, the energy is generated in the system itself and is completely autonomous.
I therefore decided to use a solar panel to recharge the onboard battery.
A battery is necessary to be able to have lights in the darkness and to be able to operate accessories and both bilge pumps, for example.
Incidentally, the engine needed a limited overhaul. The compression was still fine and the overall mechanical condition was certainly not bad.
But the fuel system needed some attention. I have replaced all the old rubber, both spark plugs and the dots.
Much of the required material (rubber rings, float needle, filters, etc.) is still readily available on the internet.
The tail oil has also been replaced and the known lubrication points have been checked.
The impeller seemed to have been replaced - I left it for what it is.
The original stickers had been damaged in the course of 50 years and I wanted to put the engine back on the spot.
Fortunately, it appears that there are lively communities that cherish vintage outboard engines. In the US I could order a replacement sticker set for my motorcycle! It is true that it is not NOS, but perfectly recreated and it fits well.
The engine runs smoothly and at full throttle it runs 5500 rpm.
The standard screw seems to be perfectly suitable for the combination of motor and boat.
Because of the large couple of a two-stroke, the Jolly quickly plans. However, it has become a bit heavier due to all the adjustments.
With two people I get a speed of 38 km / h on the GPS with flat water.
With a little persistence he might get a little more, but in my sailing area speeding is unfortunately not
llowed without a permit.... and. I'm not going to try it ...
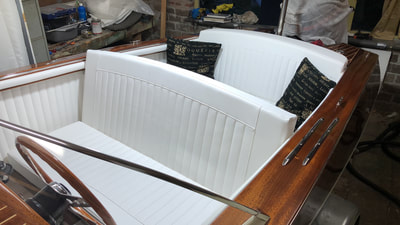
After all the technology was done, it was time to finish the interior. I opted for a light interior, with skai in a white color.
The benches were made by themselves and in doing so, good ergonomics are taken into account.
By that I mean that you can sail long without getting cramps in your legs or the visibility through the window is obstructed.
I tried with a crate just as long until I found the right sitting position.
The benches are made in such a way that you can fold the whole down so that a large sun bed is created.
The coating is outsourced to a specialized company.
As one of the last things I have applied stainless steel bumpers at the back. I had previously labeled this as unnecessary, but now I know better.
When leaving the jetty you have to be careful that the boat does not turn out and gets a little bit of it.
Apparently I have to develop my sailing skills a bit.
When I take stock of the balance after 4 years,
I feel satisfied.
The boat has become exactly the same as I had in mind at the beginning of the story.
And the financial picture has not become excessive. It did take a lot of free time and I could not have achieved this result without the help of others. I look back on a beautiful adventure and now sail!
I am really a proud owner of a Arcangeli Jolly!!!
Greetings; Carl Reitsma

